Digital Photography and Imaging
06/04/18 – 22/06/18 (Week 1 – Week 13)
Kitty Lai Yung Syn, (0331933)
Digital Photography and Imaging
Week 1
06/04/2018
Photoshop Editing
Today, Mr Jeffrey taught us some basic knowledge on Photoshop, which are:
06/04/2018
Photoshop Editing
Today, Mr Jeffrey taught us some basic knowledge on Photoshop, which are:
- Interface Overview
- Shortcut keys
- Quick selection
- Layer
- Masking
- Opacity
- Free Transform
- Filter > Gaussian Blur
- Filter > Distort > Ripple
- Using Brush
- Saving PSD
Lighting (Main Light)
It is essentially that!
It is the most important light because it illuminates a major portion of the image. All the other light are constructed around this light.
So if shooting a still life or a person, the first light to be put in position is your main light.
It is essentially that!
It is the most important light because it illuminates a major portion of the image. All the other light are constructed around this light.
So if shooting a still life or a person, the first light to be put in position is your main light.
Lighting (Fill light)
The fill lights function is to basically relieve the shadow areas created by the main light, thereby reducing the contrast.
This light produces detail in the shadow. Sometimes a fill light can just be a reflector bouncing off the main light (feeding off).
In case of a still life there can be many tiny fills positioned around the still life to illuminate or relieve shadows.
In case of a still life there can be many tiny fills positioned around the still life to illuminate or relieve shadows.
Lighting (Rim Light)
This light gives form or structure around the object or subject being photographed. It creates a silhouette around the subject/object thereby revealing its shape. It most often acts as a highlight.
Lighting (Hair light)
This is self explanatory, it basically illuminates and gives texture to the hair. Without this light the hair texture would essentially not be visible and the hair will look like one black mass.
- the more lightings were set up, the more difficult to shoot because it will be very complicated
- always keep the background away from the subject minimum 6 to 4 feet
- we don't need light for sack, we just need light from daylight
We were taught to use filters, colour correction, dodge and burn tool to edit the pictures given below.
Before
Week 3:
13/04/2018
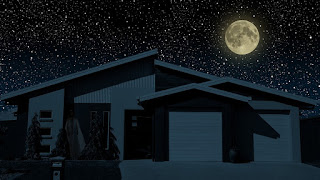
Today we learned how to change daylight to night time and we were also told to create an ghost house. Below is the outcome of my work.
 |
| Ghost House (Outcome) |
 |
| Before |
Week 4:
20/04/2018
Displacement map
smart object
In our photography class, we had a lot of fun while shooting photos. We learned about lightning and some basic manual settings. These are some of the photos I had taken.
Week 5
27/04/2018
Today we learned about displacement map, applying a snake skin onto a human face.
27/04/2018
Today we learned about displacement map, applying a snake skin onto a human face.
 |
| Outcome |
Week 6
04/05/2018
This week we were doing displacement map again but we could choose our own pictures.
04/05/2018
This week we were doing displacement map again but we could choose our own pictures.
 |
| Outcome |
 |
Week 8
18/05/2018
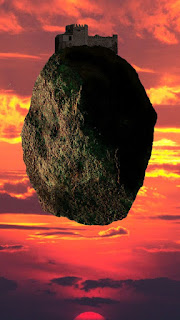
This week, we did something very different and very fun. From all the editing skills we have learned through the semester, we had to recreate 'The castle of the Pyrenees'.
 |
| Original photo |
 |
| Final Outcome |
Week 9
25/05/2018
Today, we learned how to use perspective warp and puppet tool to change the perspective of an object, human or a building.
Perspective Warp:
 |
| Before |
 |
| After |
 |
| Final Outcome |
Week 13
22/06/2018
Today, we were lectured on After Effect. So, basically, we learned about the basics like timeline, opacity, setting and transformation effect by using 3 RGB squares.
 |
| Figure 1. Process 1 |
 |
| Figure 2. Process 2 |


Comments
Post a Comment